- Published on
TrueNAS backed PVCs on Talos Kubernetes using Democratic CSI
- Authors

- Name
- Daniel Herrmann
Background and Introduction
Using Kubernetes in the cloud offers several benefits, most notably having the luxury of the cloud provider sorting out the "boring" stuff for you, including networking and storage. We run small Kubernetes cluster on-prem, hosting various services such as databases, n8n, paperless, logging and monitoring stack and more.
When running Kubernetes on-premises you have to choose a Kubernetes distribution (we use Talos which I'll recommend here, but this article mostly applies to other distributions, too). Then you also have to provide your storage, if you don't want to stick with hostpath, which sticks your workload to one particular node.
Kubernetes provides a Container Storage Interface (CSI) which can be used to bring your own storage. There are many options, including Longhorn or CEPH optionally with the Rook Storage Operator. Both of those have in common that you need disks directly attached and exposed to the Kubernetes nodes. If that is the case for you, go for one of those, they're solid choices!
We're running Talos Linux (3 management and 9 worker nodes) as virtual machines on top of a Proxmox cluster, therefore we needed another solution. Given that we've recently built a decently sized TrueNAS appliance, lets use that!
Talos, TrueNAS, Democratic CSI
This article will be an end to end guide on how to integrate Kubernetes (Talos specifically) with TrueNAS using Democratic CSI. There are many guides available, some linked in the project repository, those are often quite old or doing things that are not neccessary.
Goals:
- API only connection (I do not like the idea of a CSI running ZFS commands on my NAS via SSH)
- NFS and iSCSI volumes
- Secure and minimalistic configuration on TrueNAS
- Snapshot support
Involved components:
- A Kubernetes cluster running Talos Linux (Talos version 1.11.2, Kubernetes version 1.34.1)
- A TrueNAS appliance (version 25.04.2.3)
Preparation
Kubernetes / Talos
How to install Kubernetes or Talos is out of scope of this article. Specifically for iSCSI I'll mention the boot assets though, as this tripped me up for a while. The option to install system extensions in the .machine.install section of the Talos machine configuration is deprecated in favor of boot assets. This means that instead of editing the machine config to load certain extensions, we make sure that the boot image has those extensions built in. The image factory provides a convenient way of generating these assets.
When going through the image factory wizard, make sure to add the siderolabs/iscsi-tools (v0.2.0) extension to your configuration. You'll end up with a unique ID and the option to download the ISO file. What tripped me up: simply installing from the ISO file will not automatically install the extension! The important step is actually written on the summary page:
For the initial installation of Talos Linux (not applicable for disk image boot), add the following installer image to the machine configuration: factory.talos.dev/metal-installer/c9078f9419961640c712a8bf2bb9174933dfcf1da383fd8ea2b7dc21493f8bac:v1.11.2
If you've already installed Talos without using this image, you'll need to upgrade the nodes to the image containing the neccessary extensions. Upgrading to the same version is fine, so you don't neccessarily have to increase the version. Note however that this will reboot your nodes (one by one):
talosctl upgrade --nodes <node-ip> --image factory.talos.dev/metal-installer/<your-id>:<version>

# Example
talosctl upgrade --nodes <node-ip> --image factory.talos.dev/metal-installer/c9078f9419961640c712a8bf2bb9174933dfcf1da383fd8ea2b7dc21493f8bac:v1.11.2
You can then verify that the extension is properly running:
talosctl -n <node-ip> get extensions
NODE         NAMESPACE   TYPE              ID   VERSION   NAME               VERSION
<node-ip>    runtime     ExtensionStatus   0    1         iscsi-tools        v0.2.0
<node-ip>    runtime     ExtensionStatus   1    1         qemu-guest-agent   10.0.2
Snapshot Support
Depending on your Kubernetes distribution, you may need to install the snapshot controller. Those can simply be installed using the provided manifests:
# Install the snapshot CRDs
kubectl kustomize https://github.com/kubernetes-csi/external-snapshotter/client/config/crd | kubectl create -f -

# Install the snapshot controller
kubectl kustomize https://github.com/kubernetes-csi/external-snapshotter/deploy/kubernetes/snapshot-controller | kubectl create -f -
TrueNAS
Again, setting up TrueNAS is out of scope for this article, I'm assuming your instance is up and running already. We're creating two new users on the TrueNAS appliance:
- One user with API permissions that will be used by Democratic CSI to make the neccessary changes
- One user that serves as data owner for NFS datasets. Having its UID and GID at hand will be required later
k8sadmin User
Go to Credentials > Users and Add. We need the following settings:
- Full Name:
K8s Admin - Username:
k8sadmin - Password:
<choose-a-strong-password> - Enable
create primary group - Shell:
nologin - Disable:
SMB User
The password as such is not relevant, as we'll be using an API token for authentication. Next, go to Credentials > Groups and select the automatically created group k8sadmin. Edit the group and add the permissions by adding the privileges Local Administrator. Unfortunately its not possible to define custom roles.
Next, go back to Credentials > Users and click Api Keys at the top right. Create a new API key, give it a name like Kubernetes CSI and select the user k8sadmin. Copy the generated key, we'll need it later.
NFS User
We also need a user that will own the NFS datasets. Create another user with the following settings:
- Full Name:
K8s NFS - Username:
nfs - Disable Password
- Enable
create primary group - Shell:
nologin - Disable:
SMB User
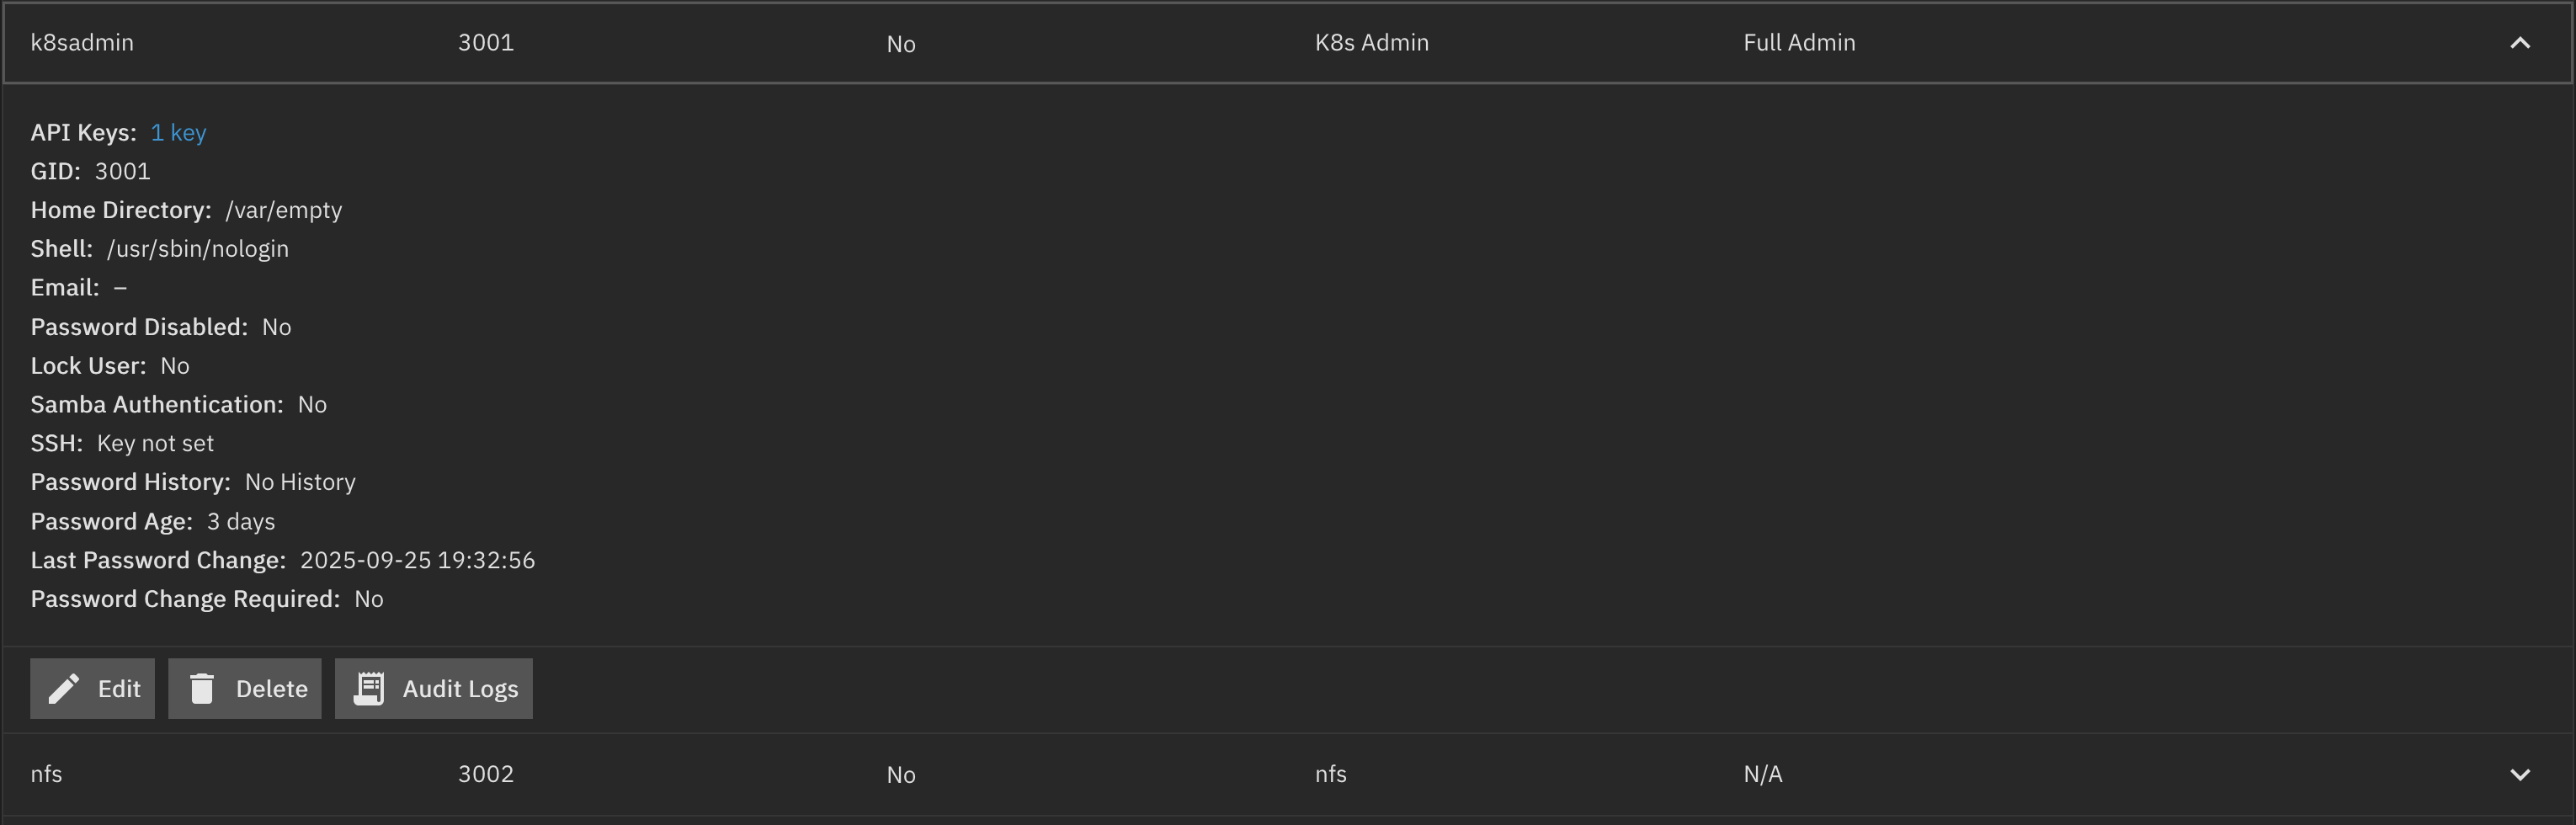
After completing this steps it should look somewhat like this:
Networking
A quick word about networking - depending on your setup you may want to have one or multiple additional VLANs for your storage traffic. In our case we have management VLANs (one for storage, one for the cluster nodes) and two isolated storage VLANs with jumbo frame support, one each for iSCSI and NFS. Configuring this is out of scope for this article, just two notes that helped me a lot:
You can query the available interfaces of your Talos nodes using:
talosctl get links --nodes <node-ip>
NODE         NAMESPACE   TYPE         ID                VERSION   TYPE       KIND     HW ADDR                                           OPER STATE   LINK STATE
<node-ip>    network     LinkStatus   cilium_host       4         ether      veth     e2:b6:ba:eb:48:85                                 up           true
<node-ip>    network     LinkStatus   cilium_net        3         ether      veth     86:4d:8b:3c:2e:b2                                 up           true
<node-ip>    network     LinkStatus   cilium_vxlan      2         ether      vxlan    ce:7e:f4:cf:f5:fb                                 unknown      true
<node-ip>    network     LinkStatus   ens18             2         ether               bc:24:11:6d:ca:32                                 up           true
<node-ip>    network     LinkStatus   ens19             2         ether               bc:24:11:2e:9e:cd                                 up           true
<node-ip>    network     LinkStatus   ens20             2         ether               bc:24:11:91:96:d9                                 up           true
You can then patch the machine configuration to add the neccessary IP addresses and MTU. Example:
machine:
  network:
    hostname: "talos-worker3"
    interfaces:
      - interface: ens19
        mtu: 9000
        addresses:
          - 10.1.251.223/24
      - interface: ens20
        mtu: 9000
        addresses:
          - 10.1.252.223/24
NFS Setup
Now lets start with the NFS configuration. First, we need to prepare a couple of things on TrueNAS
TrueNAS Configuration
- Go to System, Services and click the pencil icon next to NFS
- If you have a dedicated NFS network, select it under
Bind IP Addresses - Enable NFSv3 (it may be possible to make NFSv4 work, too, but I haven't tried it)
- Enable the service and configure it to start on boot
Next, we need to create a dataset that will be used. In contrast to many other guides, these datasetets do not need to be shared via NFS, instead Democratic CSI will create child datasets for each PVC and automatically configure the sharing settings. You'll need two datasents, one for the actual volumes and one for the snapshots.
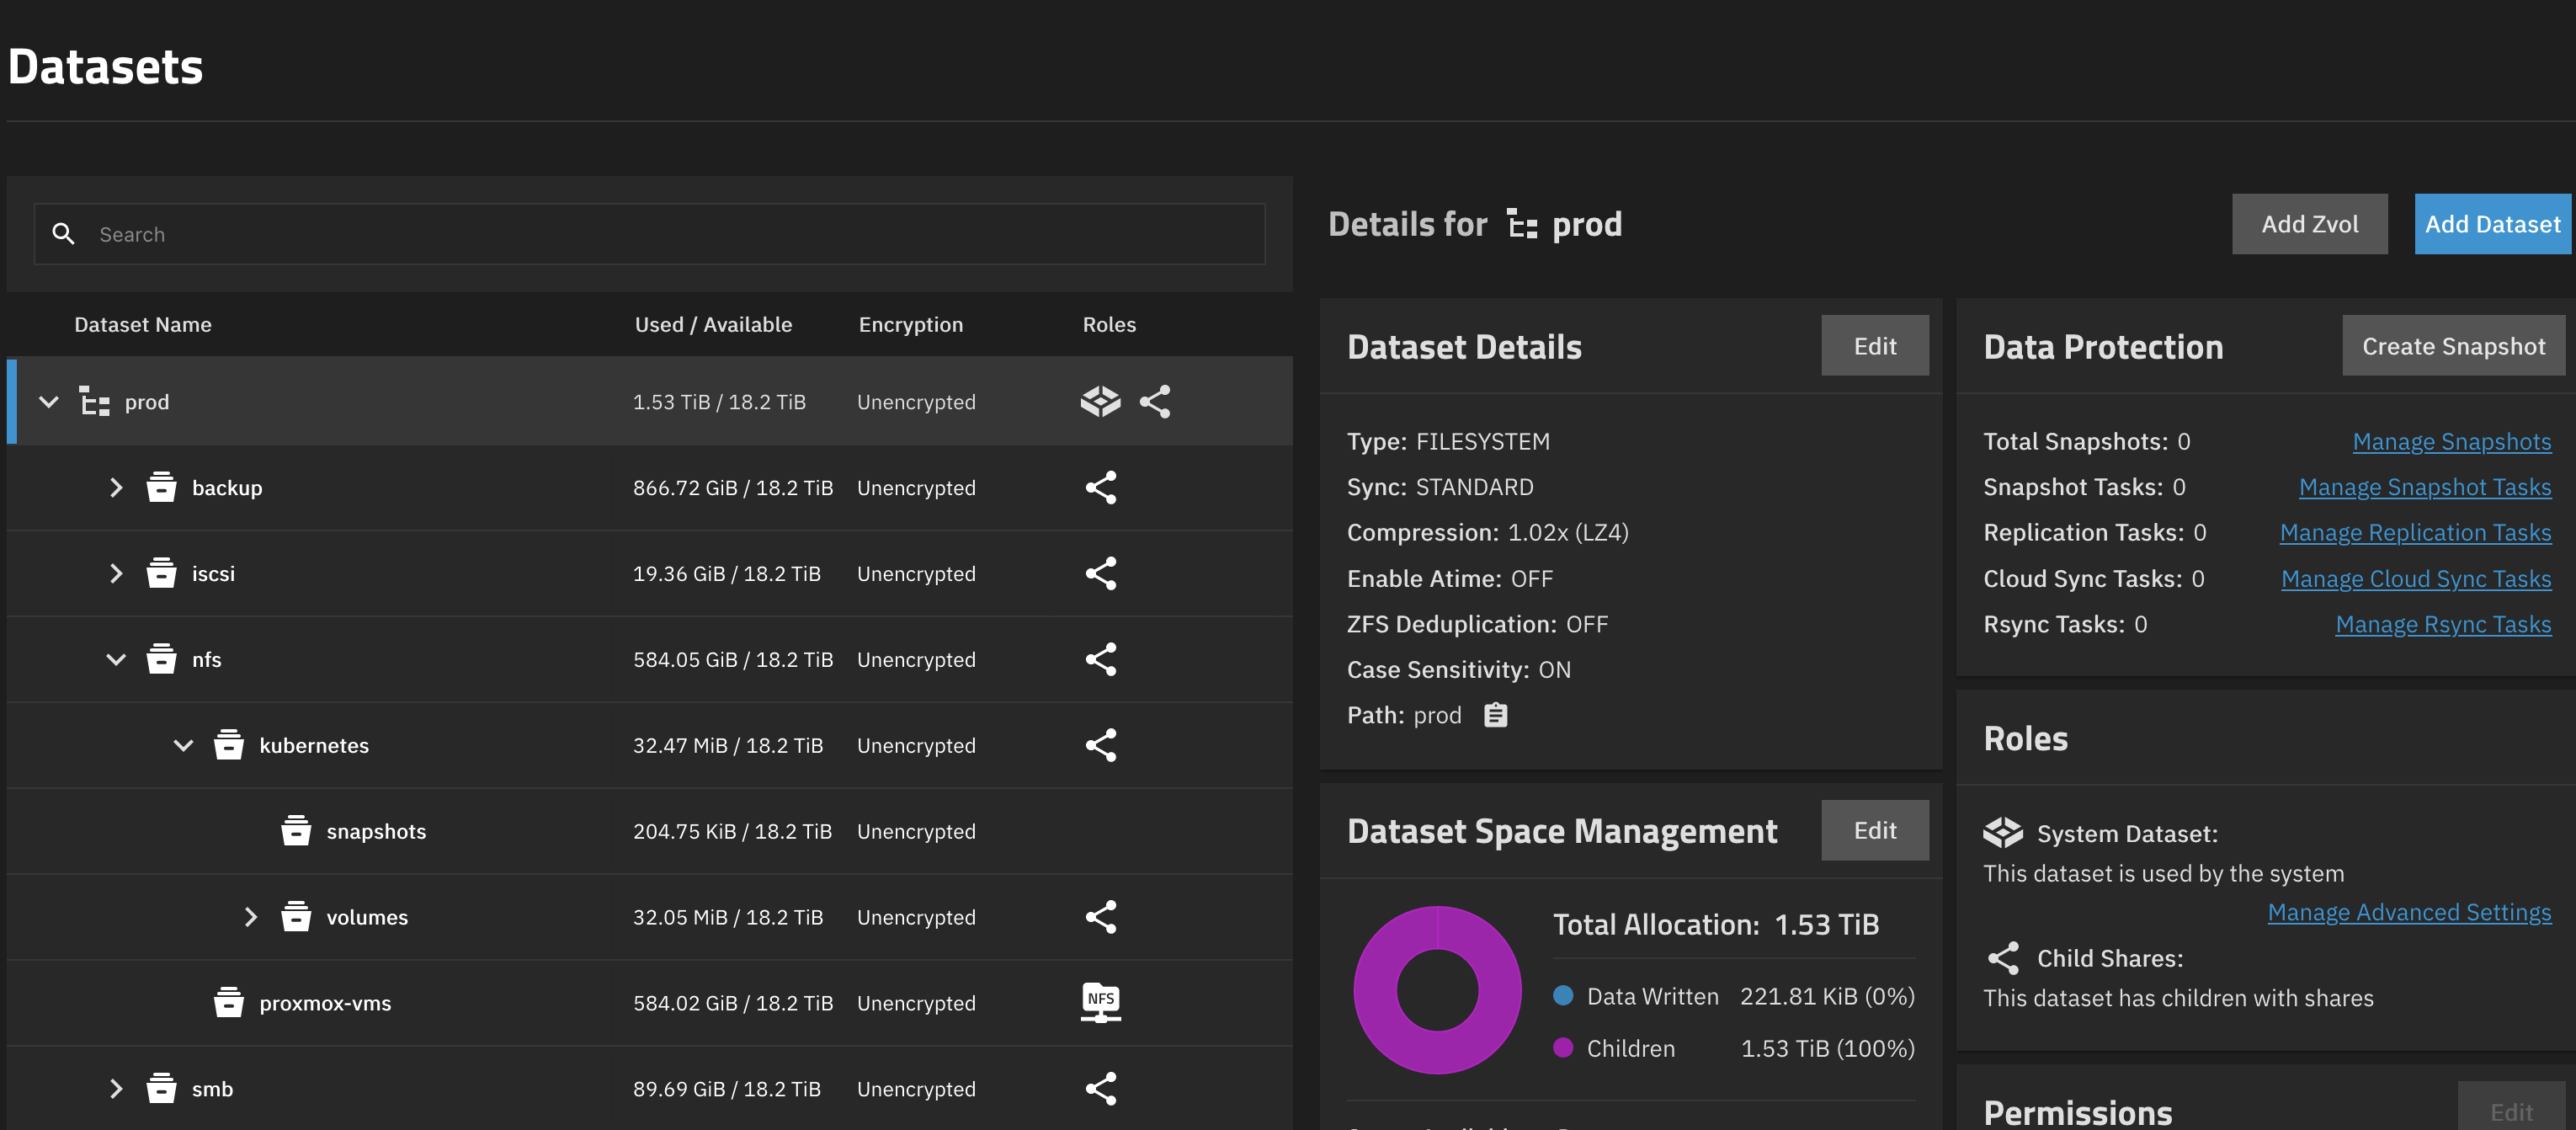
Go to Datasets and create a structure to your liking, just make sure you end up with two datasets, which may not be children of each other (but can be siblings). Using the default dataset presets is fine. This should look somewhat like this:
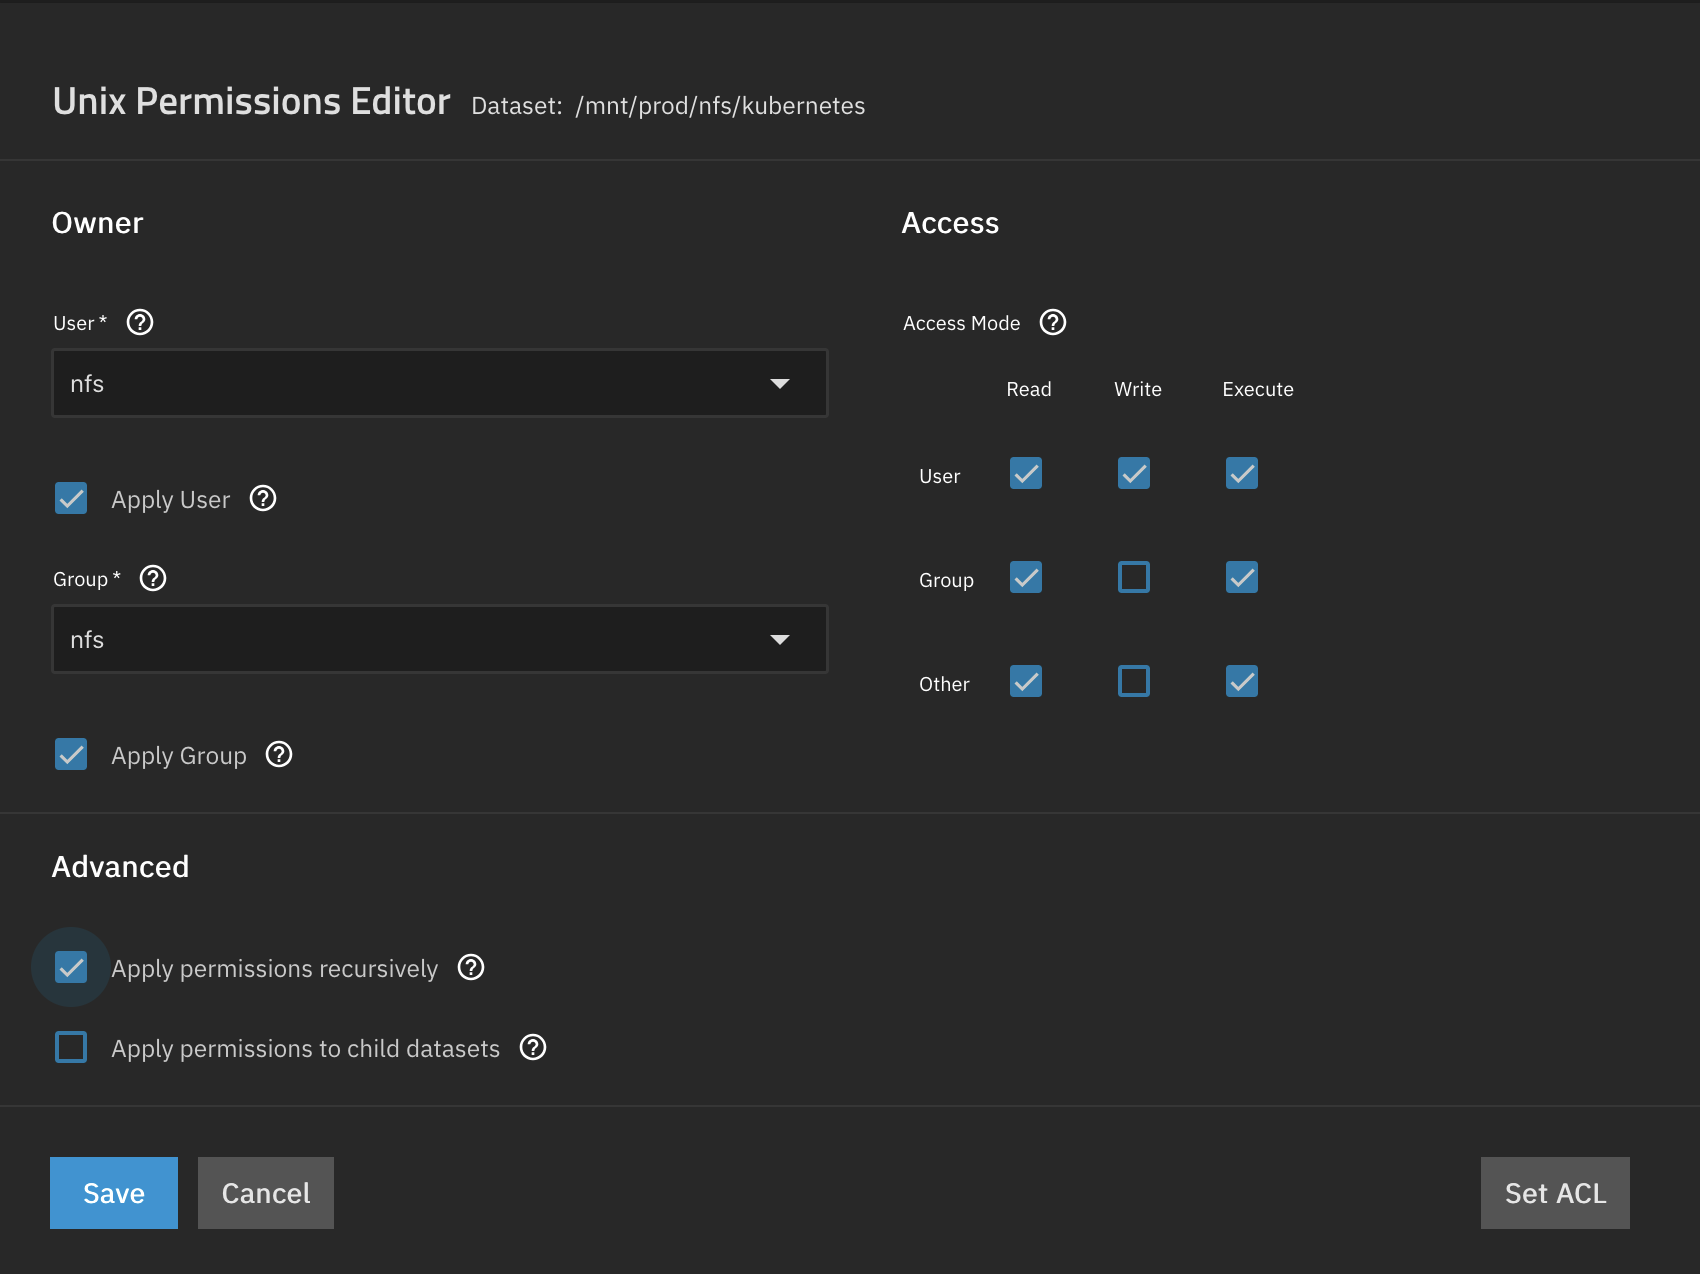
Next we change the permissions of both datasets to be owned by the nfs user we created earlier. Click on the parent dataset (if you have one, otherwise repeat the steps for both datasets) and and select Edit in the permissions widget. Change the owner user and group to nfs, confirm both changes and apply the changes recursively.
Democratic CSI Deployment
The next step is to deploy Democratic CSI to the cluster. The project provides a Helm chart which we are going to use, however finding the correct values was a bit challenging. In general, we need to provide the driver and its details and the storageClasses and `volumeSnapshotClasses`` it should create. The driver details contain the TrueNAS connection details, including the API user, therefore I decided to use a Kubernetes secret for that.
---
apiVersion: v1
kind: Secret
metadata:
  name: truenas-nfs-driver-config
  namespace: storage
stringData:
  driver-config-file.yaml: |
    driver: freenas-api-nfs
    httpConnection:
      allowInsecure: true
      apiKey: $TRUENAS_API_KEY
      host: <your-truenas-ip>
      port: 80
      protocol: http
    instance_id: null
    nfs:
      shareCommentTemplate: "{{ parameters.[csi.storage.k8s.io/pvc/namespace] }}-{{ parameters.[csi.storage.k8s.io/pvc/name] }}"
      shareAlldirs: false
      shareAllowedNetworks:
      - 10.1.251.0/24
      shareHost: 10.1.251.10
      shareMapallGroup: nfs
      shareMapallUser: nfs
    zfs:
      datasetEnableQuotas: true
      datasetEnableReservation: false
      datasetParentName: prod/nfs/kubernetes/volumes
      datasetPermissionsGroup: 3002
      datasetPermissionsMode: "0777"
      datasetPermissionsUser: 3002
      detachedSnapshotsDatasetParentName: prod/nfs/kubernetes/snapshots
      datasetProperties:
        "org.freenas:description": "{{ parameters.[csi.storage.k8s.io/pvc/namespace] }}/{{ parameters.[csi.storage.k8s.io/pvc/name] }}"
A few notes:
- Setting a
shareCommentTemplateis very useful to identify shares. Those will be displayed if you inspect NFS shares - Similarly, setting the
org.freenas:descriptionproperty on datasets shows the comment on the dataset itself - The
shareAllowedNetworksshould contain the network(s) your Kubernetes nodes are in - The
shareHostshould be the IP address of your TrueNAS appliance in the network - The
datasetParentNameanddetachedSnapshotsDatasetParentNameshould be the full path to the datasets you created earlier - The
datasetPermissionsUseranddatasetPermissionsGroupshould be the UID and GID of thenfsuser you created earlier.
Create the namespace and the secret:
kubectl create namespace storage
kubectl apply -f truenas-nfs-driver-config.yaml

# If using Talos, we also need to allow privileged containers in the storage namespace
kubectl label namespace storage pod-security.kubernetes.io/enforce=privileged
With this secret created, we can now create a values.yaml file for the Helm chart:
controller:
  driver:
    image:
      tag: next
csiDriver:
  name: nfs
driver:
  config:
    driver: freenas-api-nfs
  existingConfigSecret: truenas-nfs-driver-config
storageClasses:
  - allowVolumeExpansion: true
    defaultClass: false
    mountOptions:
      - noatime
      - nfsvers=3
      - nolock
    name: nfs
    parameters:
      detachedVolumesFromSnapshots: 'false'
      fsType: nfs
    reclaimPolicy: Delete
    volumeBindingMode: Immediate
volumeSnapshotClasses:
  - name: nfs
    parameters:
      detachedSnapshots: 'true'
Again a few notes:
- We're using the
nexttag of the image as it contains an important fix to make it work with TrueNAS 24.05. See this Github Issue for details. - The
storageClassesdefines the name of the storage class, change it to your liking - The
driversection refers to the secret we created earlier. It still has to specify the driver type
We can then install the Helm chart:
helm repo add democratic-csi https://democratic-csi.github.io/charts/
helm repo update
helm upgrade --install --namespace storage --values nfs_democratic_csi_helm.yml nfs democratic-csi/democratic-csi
You should now see the storage class and the driver running:
$ kubectl get sc
NAME            PROVISIONER   RECLAIMPOLICY   VOLUMEBINDINGMODE   ALLOWVOLUMEEXPANSION   AGE
nfs             nfs           Delete          Immediate           true                   3d9h

$ kubectl get pods -n storage
NAME                                               READY   STATUS    RESTARTS      AGE
democratic-csi-nfs-controller-994c7954-xfc4s       6/6     Running   0             31h
democratic-csi-nfs-node-48h76                      4/4     Running   5 (22h ago)   31h
democratic-csi-nfs-node-hrgqj                      4/4     Running   1 (31h ago)   31h
democratic-csi-nfs-node-jx8xs                      4/4     Running   5 (22h ago)   31h
We can now test the setup by creating a PVC and mounting it to a pod:
---
apiVersion: v1
kind: Namespace
metadata:
  name: test
---
apiVersion: v1
kind: PersistentVolumeClaim
metadata:
  name: test-pvc
  namespace: test
spec:
  accessModes:
    - ReadWriteMany
  storageClassName: nfs
  resources:
    requests:
      storage: 10Gi
---
apiVersion: v1
kind: Pod
metadata:
  name: storage-test-pod
  namespace: test
  labels:
    app: storage-test
spec:
  containers:
  - name: test-container
    image: busybox:1.36
    command:
    - sleep
    - "3600"
    volumeMounts:
    - name: test-volume
      mountPath: /data
  volumes:
  - name: test-volume
    persistentVolumeClaim:
      claimName: test-pvc
  restartPolicy: Never
Apply the manifest and check that the pod is running:
$ kubectl apply -f test-pvc-pod.yaml
$ kubectl get pods -n test

# You can also exec into the pod and create a test file
$ kubectl exec -it storage-test-pod -n test -- sh
/ # echo "Hello World" > /data/hello.txt
/ # exit
You should now see a new share on TrueNAS and a new dataset created, which is automatically shared via NFS.
Cleanup:
kubectl delete -f test-pvc-pod.yaml
iSCSI Setup
iSCSI setup is relatively similar, we just have to prepare a few things on the TrueNAS side. Many guides use the iSCSI wizard, which creates a lot of things we don't need. We'll go for the minimalistic setup and only create the neccessary components.
TrueNAS Configuration
Basic iSCSI Setup
First, we need to enable the iSCSI service. Go to System, Services and enable the iSCSI service. Configure it to start on boot. You typically don't need to change any settings, but if you want to use a different port instead of the default 3260, you can change it here.
Next, we configure the iSCSI targets. This setting is a bit hidden. Go to Shares and click on the small icon right between the text Block (iSCSI) Shares Targets and the RUNNING badge:
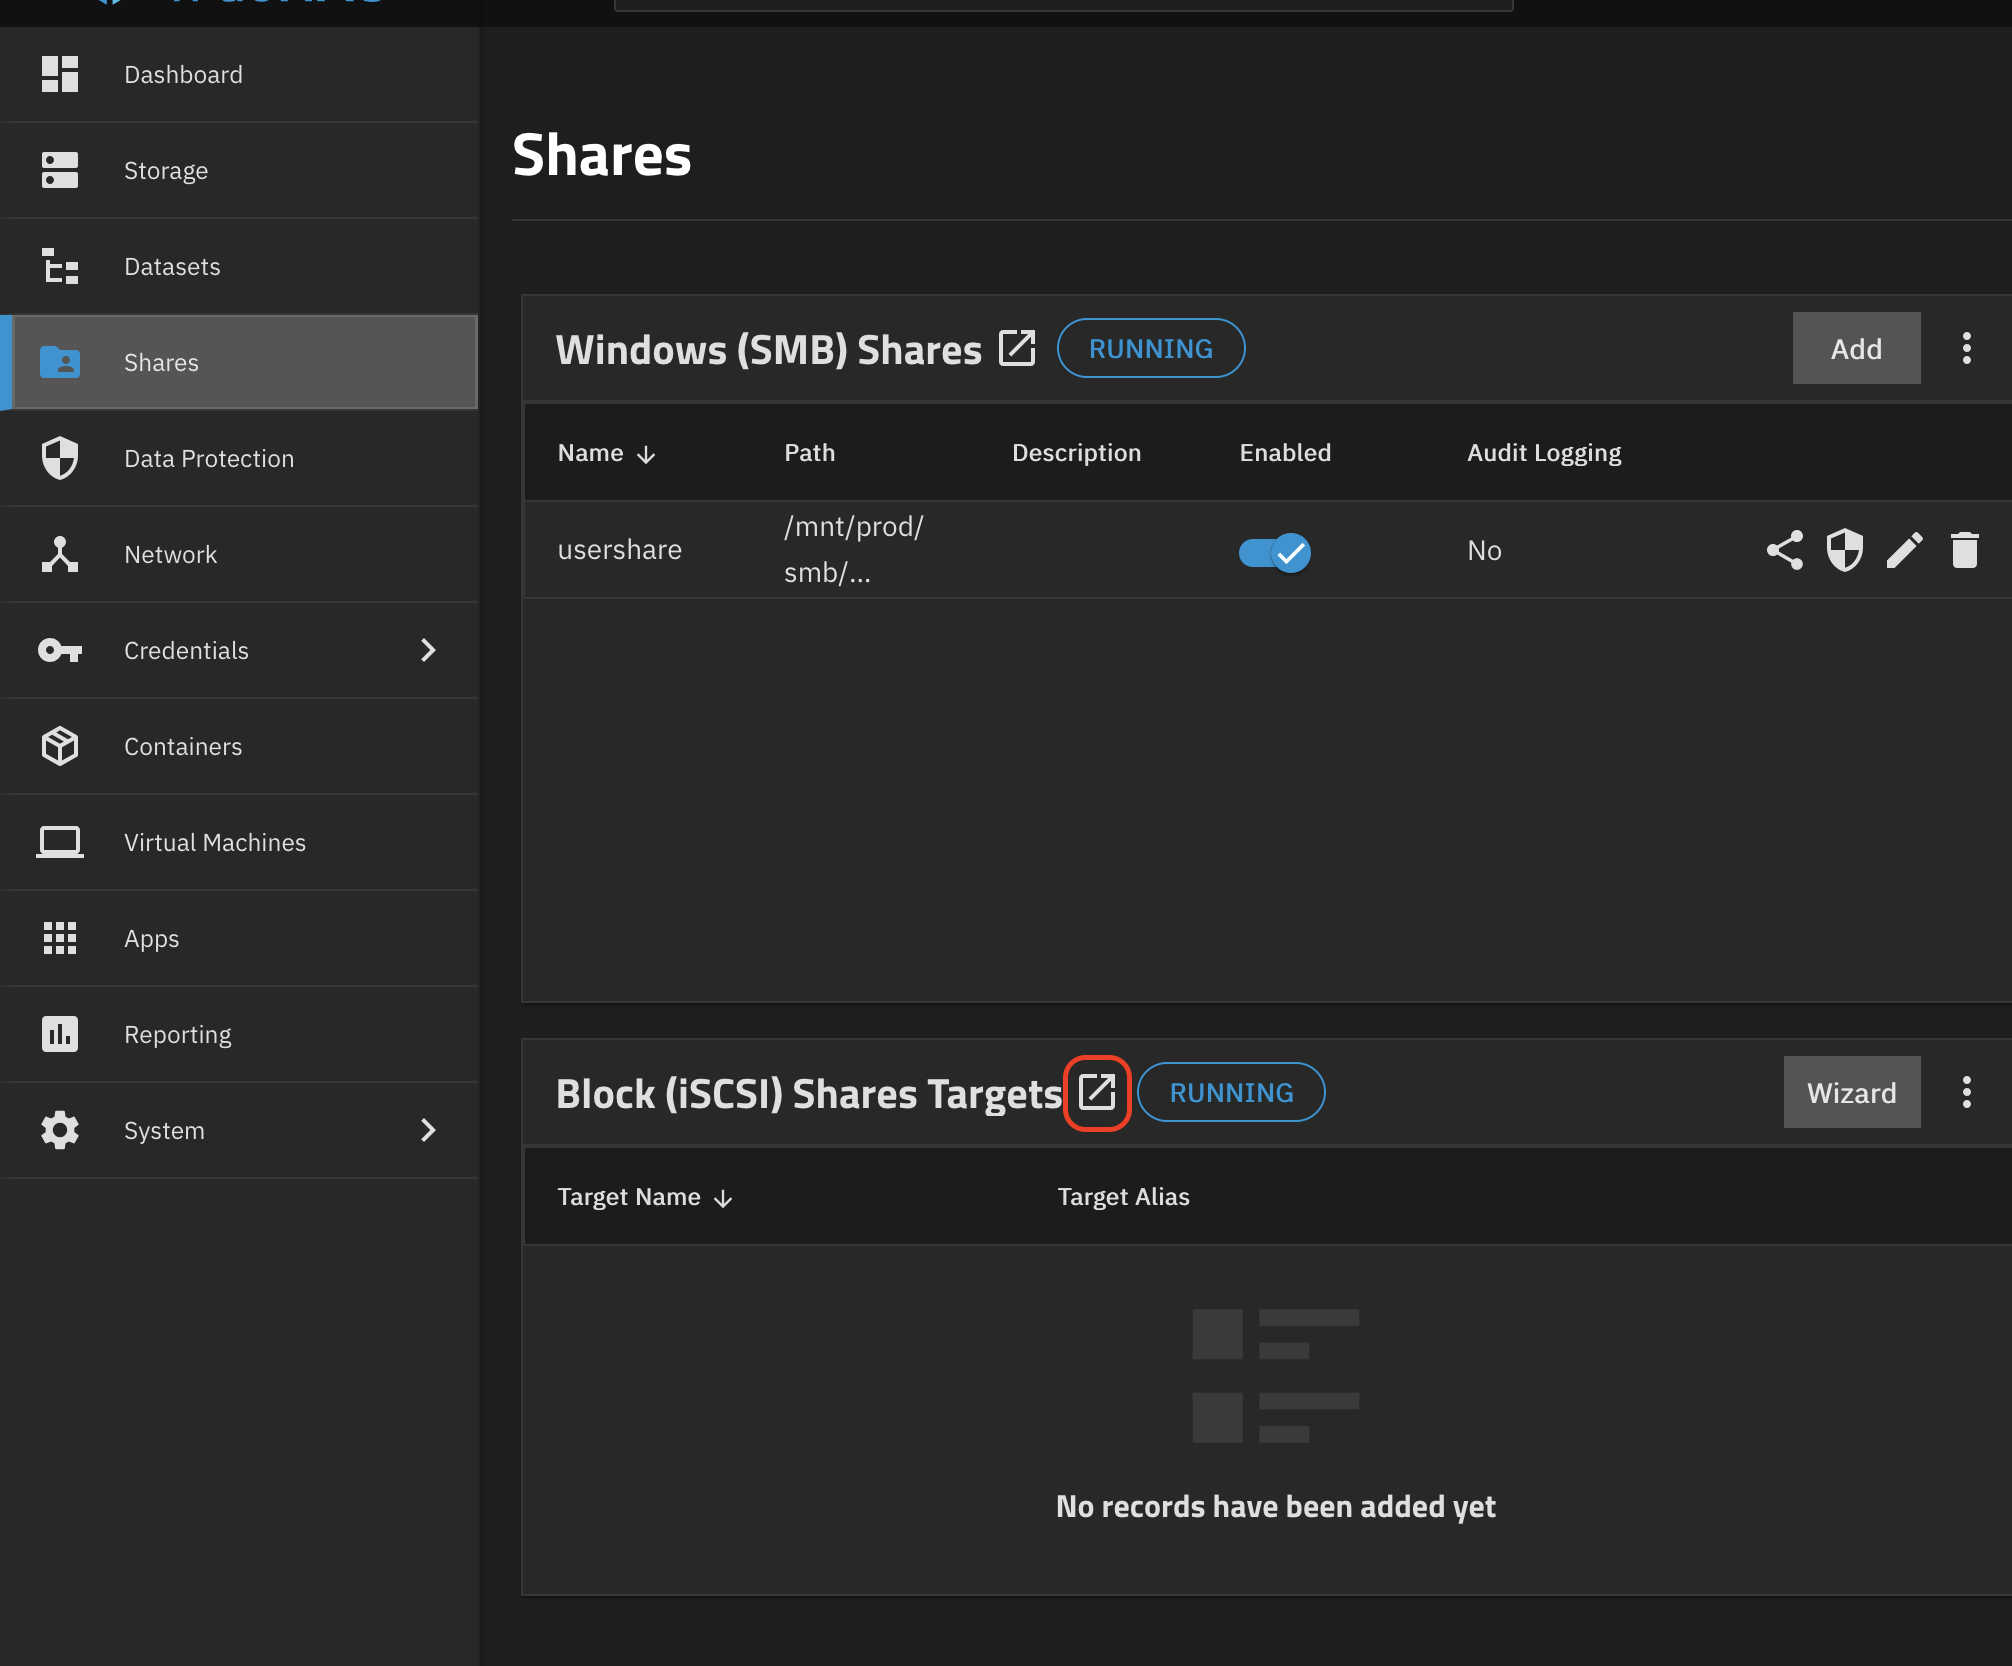
It is not required to configure any targets or extents, this will be handled by the CSI driver via the API. However, an Initiator Group (essentially an ACL) is required, a portal needs to be configured. For the iniator group we would need to know the IQN of our Talos nodes, which I was unable to find before the first connection attempt. Therefore I created a very permissive initiator group that allows all initiators:
- Go to the Initiator Groups tab and Add a new group
- Select
Allow all initiators - Optionally add a description
- Save
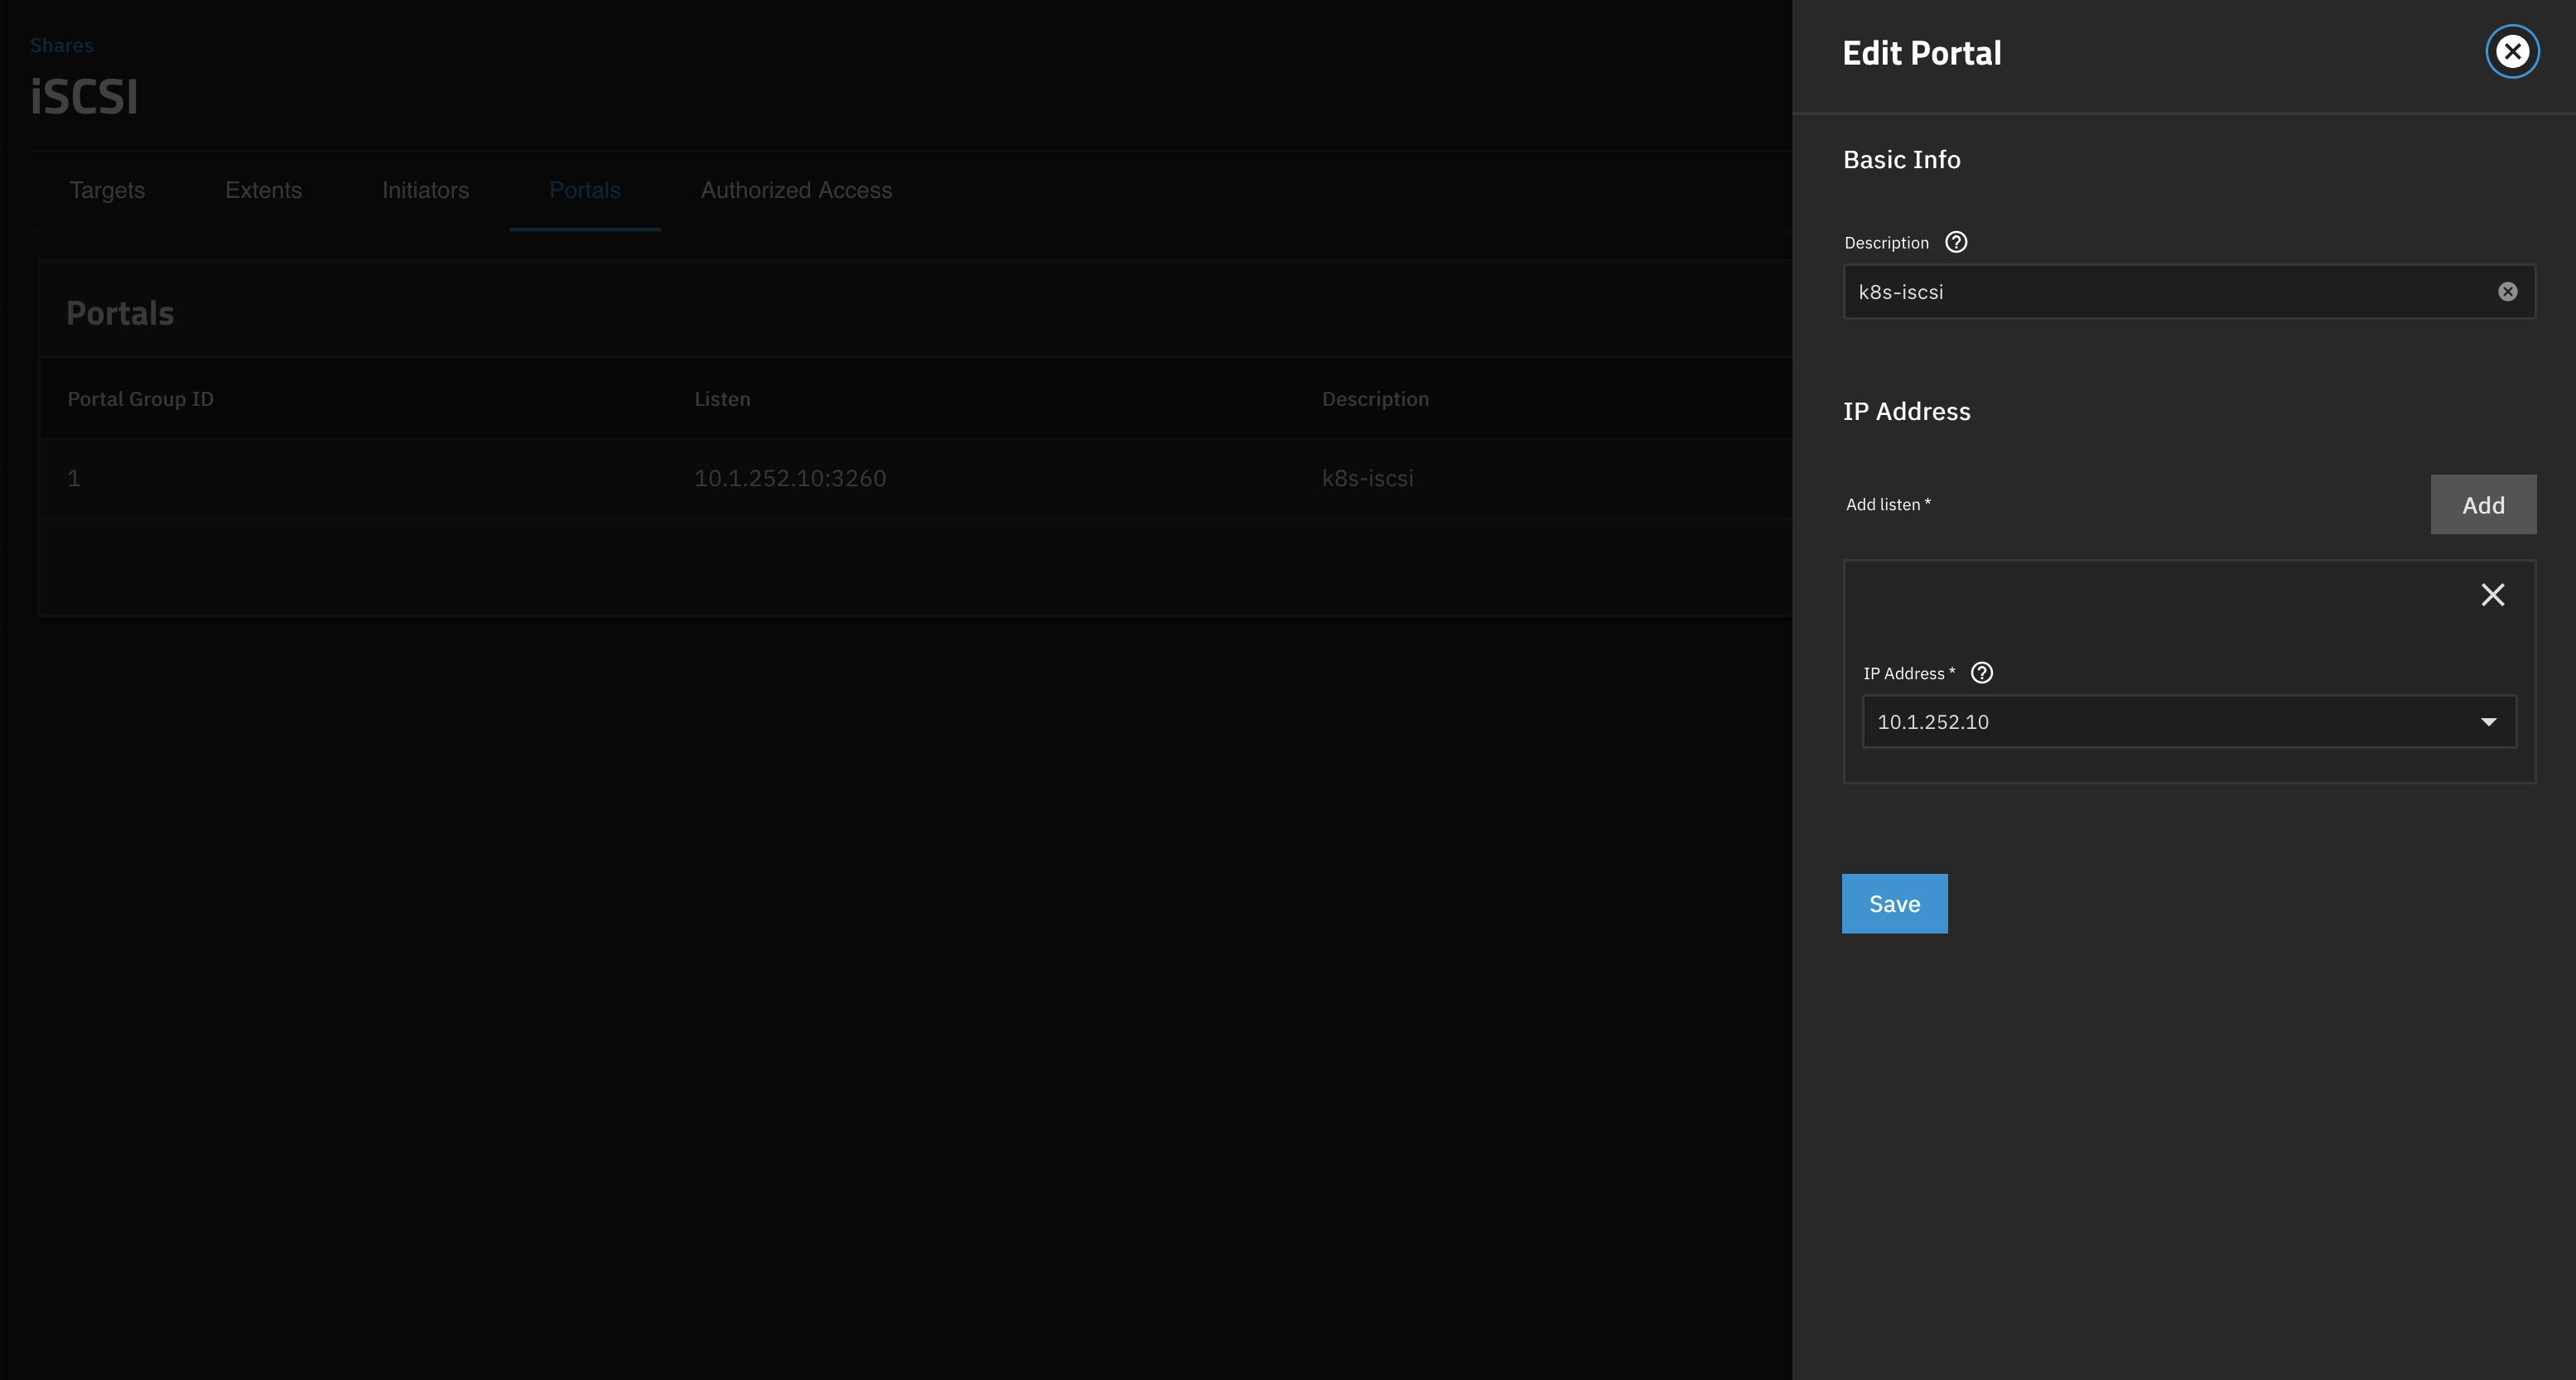
Note down the initiator group ID, we'll need it later. Next, lets add a portal (essentially on which interface the iSCSI service will listen):
- Go to the Portals tab and Add a new portal:
- Select the interface you want the iSCSI service to listen on
- Optionally add a description
- Save
Note down the portal ID, we'll need it later. Apparently there's some bug in the TrueNAS UI not always showing the correct ID (although I haven't seen it), so in doubt double check the ID by using the TrueNAS CLI:
sharing iscsi portal query
+----+--------+-----+-----------+
| id | listen | tag | comment   |
+----+--------+-----+-----------+
| 1  | <list> | 1   | k8s-iscsi |
+----+--------+-----+-----------+
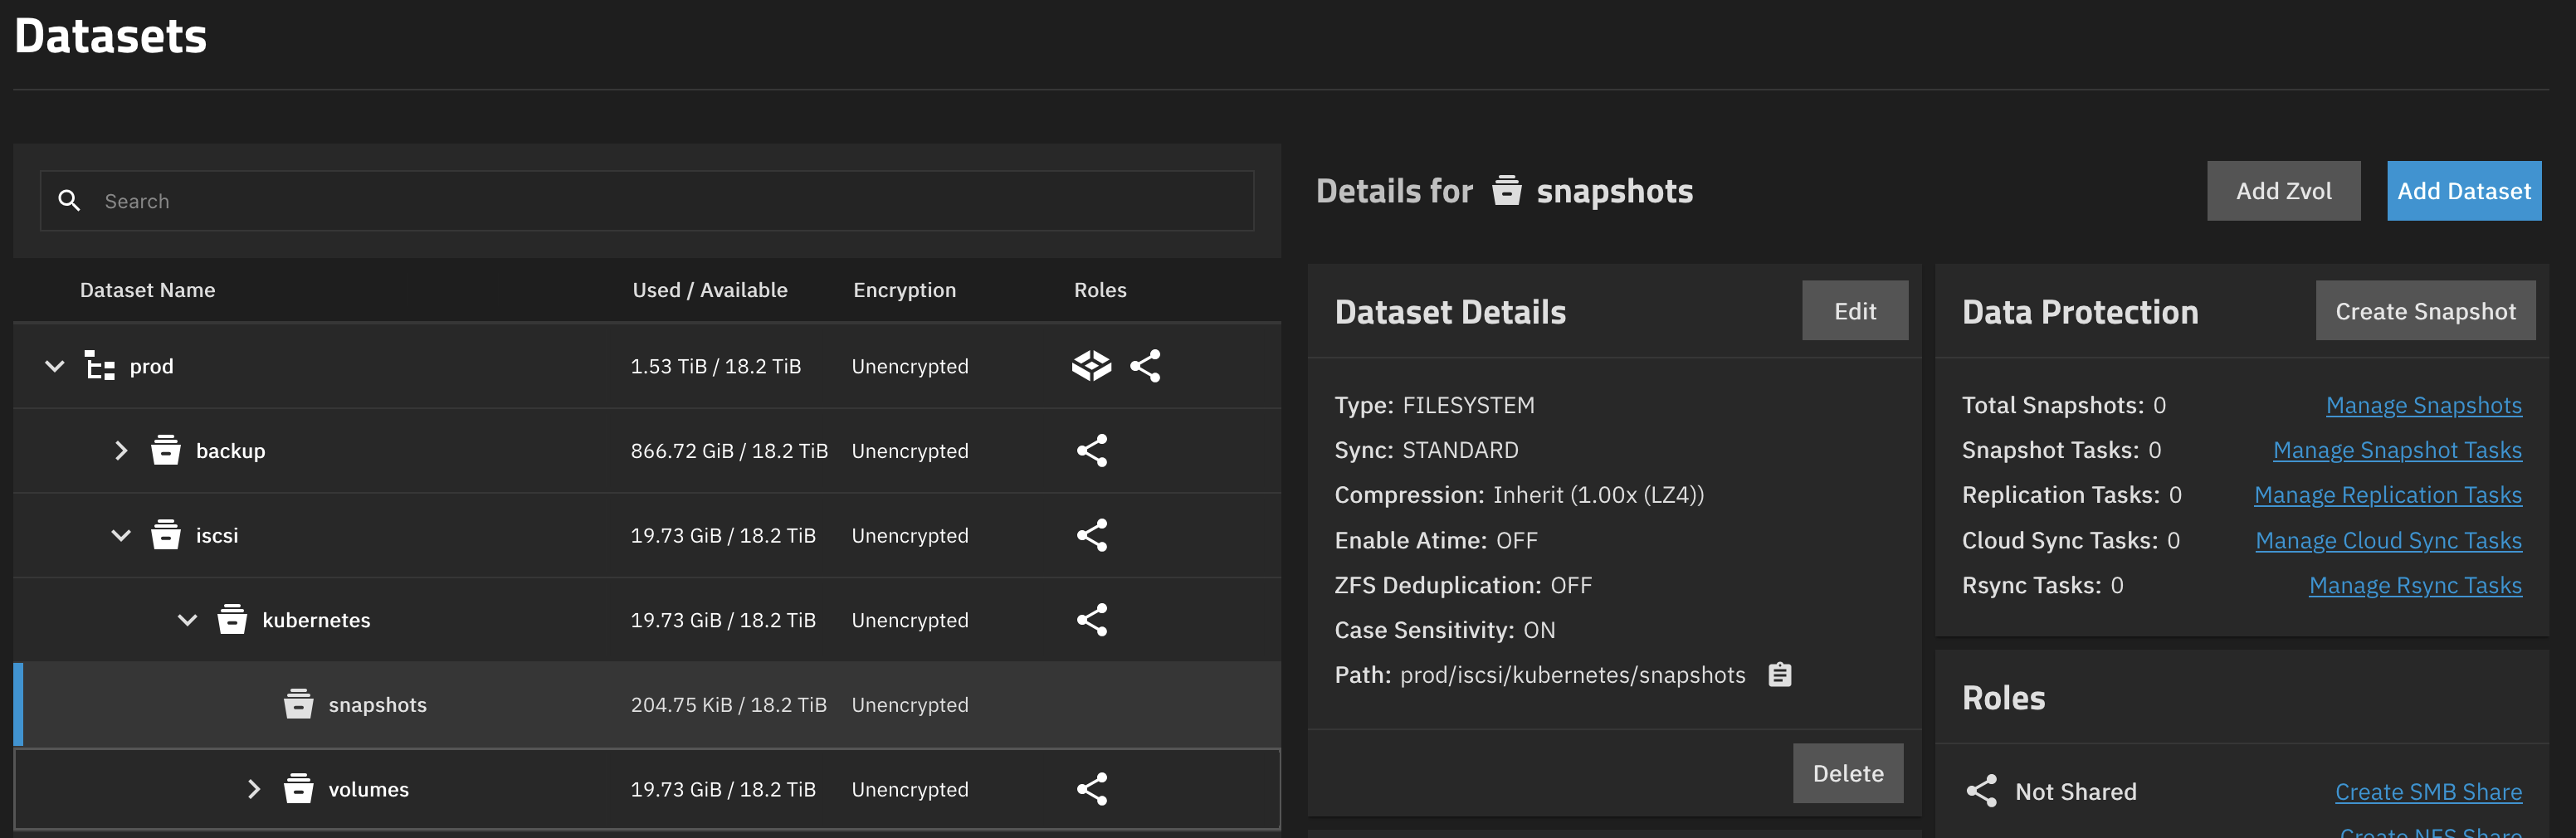
Datasets
We also need to create two datasets, one for the actual volumes and one for the snapshots. Create them similar to the NFS datasets, just make sure they are not children of each other. No special settings are required. Just make sure to note the dataset paths, we'll need them later. It should look somewhat like this:
Democratic CSI Deployment
The iSCSI deployment is very similar to the NFS one. We again create a secret containing the driver configuration:
---
apiVersion: v1
kind: Secret
metadata:
  name: truenas-iscsi-driver-config
  namespace: storage
stringData:
  driver-config-file.yaml: |
    driver: freenas-api-iscsi
    httpConnection:
      allowInsecure: true
      apiKey: $TRUENAS_API_KEY
      host: 10.1.10.100
      port: 80
      protocol: http
    instance_id: null
    iscsi:
      targetPortal: "10.1.252.10:3260"
      targetPortals: []
      interface:
      namePrefix: csi-
      nameSuffix: "-cluster"
      targetGroups:
        - targetGroupPortalGroup: 1
          targetGroupInitiatorGroup: 1
          targetGroupAuthType: None
          targetGroupAuthGroup:
      extentCommentTemplate: "{{ parameters.[csi.storage.k8s.io/pvc/namespace] }}/{{ parameters.[csi.storage.k8s.io/pvc/name] }}"
      extentInsecureTpc: true
      extentXenCompat: false
      extentRpm: "SSD"
      extentBlocksize: 512
      extentAvailThreshold: 0
    zfs:
      datasetParentName: prod/iscsi/kubernetes/volumes
      detachedSnapshotsDatasetParentName: prod/iscsi/kubernetes/snapshots
      zvolCompression:
      zvolDedup:
      zvolEnableReservation: false
      zvolBlocksize:
      datasetProperties:
        "org.freenas:description": "{{ parameters.[csi.storage.k8s.io/pvc/namespace] }}/{{ parameters.[csi.storage.k8s.io/pvc/name] }}"
Again some important notes:
- The
targetPortalshould be the IP address of your TrueNAS appliance in the iSCSI network - The
targetGroupPortalGroupshould be the ID of the portal you created earlier - The
targetGroupInitiatorGroupshould be the ID of the initiator group you created earlier - The
datasetParentNameanddetachedSnapshotsDatasetParentNameshould be the full path to the datasets you created earlier - The
extentCommentTemplateis very useful to identify extents, as those will be displayed in the extent list - You can also set properties for the ZFS volumes, I left most of them empty
Create the namespace and the secret:
kubectl create namespace storage
kubectl apply -f truenas-iscsi-driver-config.yaml

# If using Talos, we also need to allow privileged containers in the storage namespace
kubectl label namespace storage pod-security.kubernetes.io/enforce=privileged
With this secret created, we can now create a values.yaml file for the Helm chart:
controller:
  driver:
    image:
      tag: next
csiDriver:
  name: iscsi
driver:
  config:
    driver: freenas-api-iscsi
  existingConfigSecret: truenas-iscsi-driver-config
node:
  driver:
    extraEnv:
      - name: ISCSIADM_HOST_STRATEGY
        value: nsenter
      - name: ISCSIADM_HOST_PATH
        value: /usr/local/sbin/iscsiadm
    iscsiDirHostPath: /var/iscsi
    iscsiDirHostPathType: ''
  hostPID: true
storageClasses:
  - allowVolumeExpansion: true
    defaultClass: false
    name: iscsi
    parameters:
      detachedVolumesFromSnapshots: 'false'
      fsType: ext4
    reclaimPolicy: Delete
    volumeBindingMode: Immediate
volumeSnapshotClasses:
  - name: iscsi
    parameters:
      detachedSnapshots: 'true'
Again a few notes:
- The
extraEnvsettings as well asiscsiDirHostPathandiscsiDirHostPathTypeare required for Talos only, they not be required for other Kubernetes distributions - Depending on the Talos ISCSI extension version, the
iscsiDirHostPathis different:- For version
v0.2.0(current as of Talos 1.11.2) it is/var/iscsi - For previous versions it is
/usr/local/etc/iscsi
- For version
- You can of course choose a different file system type if desired
We can then install the Helm chart:
helm repo add democratic-csi https://democratic-csi.github.io/charts/
helm repo update
helm upgrade --install --namespace storage --values iscsi_democratic_csi_helm.yml iscsi democratic-csi/democratic-csi
You should now see the storage class and the driver running:
$ kubectl get sc
NAME            PROVISIONER   RECLAIMPOLICY   VOLUMEBINDINGMODE   ALLOWVOLUMEEXPANSION   AGE
iscsi           iscsi         Delete          Immediate           true                   32h

$ kubectl get pods -n storage
NAME                                               READY   STATUS    RESTARTS      AGE
democratic-csi-iscsi-controller-57774cfcb9-4cghk   6/6     Running   0             32h
democratic-csi-iscsi-node-45ckd                    4/4     Running   0             32h
democratic-csi-iscsi-node-b7vhp                    4/4     Running   0             23h
democratic-csi-iscsi-node-gcvwq                    4/4     Running   0             23h
Lets now test the setup by creating a PVC and mounting it to a pod:
---
apiVersion: v1
kind: Namespace
metadata:
  name: test
---
apiVersion: v1
kind: PersistentVolumeClaim
metadata:
  name: test-pvc
  namespace: test
spec:
  accessModes:
    - ReadWriteOnce
  storageClassName: iscsi
  resources:
    requests:
      storage: 10Gi
---
apiVersion: v1
kind: Pod
metadata:
  name: storage-test-pod
  namespace: test
  labels:
    app: storage-test
spec:
  containers:
  - name: test-container
    image: busybox:1.36
    command:
    - sleep
    - "3600"
    volumeMounts:
    - name: test-volume
      mountPath: /data
  volumes:
  - name: test-volume
    persistentVolumeClaim:
      claimName: test-pvc
  restartPolicy: Never
Apply the manifest and check that the pod is running:
$ kubectl apply -f test-pvc-pod.yaml
$ kubectl get pods -n test

# You can also exec into the pod and create a test file
$ kubectl exec -it storage-test-pod -n test -- sh
/ # echo "Hello World" > /data/hello.txt
/ # exit
You should now see a new share on TrueNAS and a new dataset created, which is automatically shared via NFS.
Cleanup:
kubectl delete -f test-pvc-pod.yaml
Troubleshooting
When using iSCSI and the volume is not creating with the following message:
Events:
Type     Reason                  Age                  From                     Message
----     ------                  ----                 ----                     -------
Warning  FailedScheduling        2m8s                 default-scheduler        0/6 nodes are available: pod has unbound immediate PersistentVolumeClaims. not found
Warning  FailedScheduling        115s (x2 over 115s)  default-scheduler        0/6 nodes are available: pod has unbound immediate PersistentVolumeClaims. not found
Normal   Scheduled               115s                 default-scheduler        Successfully assigned storage/storage-test-pod to talos-worker1
Normal   SuccessfulAttachVolume  115s                 attachdetach-controller  AttachVolume.Attach succeeded for volume "pvc-180149f1-c13c-4a7f-9f97-db12fc2546a9"
Warning  FailedMount             20s (x7 over 100s)   kubelet                  MountVolume.MountDevice failed for volume "pvc-180149f1-c13c-4a7f-9f97-db12fc2546a9" : rpc error: code = Internal desc = {"code":1,"stdout":"","stderr":"failed to find iscsid pid for nsenter\n","timeout":false}
This is an indication that the iSCSI boot asset is not installed correctly. Refer to the Talos section above for details.
Conclusion
Using Democratic CSI with TrueNAS and Talos is a solid solution to provide persistent storage for your Kubernetes cluster. The setup is relatively straightforward and provides a lot of flexibility. The driver supports both NFS and iSCSI, as well as snapshotting. The configuration can be done via the TrueNAS API, which is a big plus in my opinion. If you're looking for a way to provide storage for your Kubernetes cluster, give Democratic CSI a try!